 |
rodndtube.com's (OLD) MyPaipoBoards Forums. Reading but no posting on the OLD forums.
The (NEW) MyPaipoBoards Forums have moved to a new site. New registration is required.Click on the link below:
About the Forums - Read Me!
|
| View previous topic :: View next topic |
| Author |
Message |
Poobah
Dolphin Glider

Joined: 09 Jan 2004
Posts: 696
Location: California, San Diego
|
 Posted: Sun Dec 07, 2008 7:29 pm Post subject: Posted: Sun Dec 07, 2008 7:29 pm Post subject: |
 |
|
I couldn't help but think about the Morey air lubricated boards when I saw your sketches.
http://www.surfersvillage.com/surfing/29049/news.htm
I think your S-rocker board could be made without the step. Saw the noses off two old boards, then attach them together with one nose up and one down.
Something I've been meaning to update....I have a modified Trick Boardz wake board that I ride paipo style. The curve in the plywood is side to side, not front to back. Very drawn in nose and tail, with the wide point in the middle. The result is one big concave, and very little rocker down the center of the board. The rocker is in the rail line. The wake board was drilled for fins at either end, but I ride it finless. I blunted the nose, tail and rail edges, because they were too sharp for my needs. The board holds in the wave very well, and I've never pearled it (yet.) Mr. Mike has also ridden it without pearling. It's kinda/sorta like a plywood version of the old Newport Concave Vector...but larger and thinner.

The concave is about 1/2 inch deep, I used a US penny for scale in the photo.
 |
|
| Back to top |
|
 |
surffoils

Joined: 12 May 2007
Posts:
Location: Gold Coast, (finally), Australia
|
| Posted: Sun Dec 07, 2008 9:28 pm Post subject: |
|
|
| Poobah wrote: | I couldn't help but think about the Morey air lubricated boards when I saw your sketches.
http://www.surfersvillage.com/surfing/29049/news.htm
I think your S-rocker board could be made without the step. Saw the noses off two old boards, then attach them together with one nose up and one down.
Photos pending... |
Ive seen the "air-libricated" boards on the net before, but I dont give it any credit as a functional design.
I dont believe speed is about introducing air....but its more about reducing water contact and minimalising friction. Same idea, different angle.
Ive thought about doing the board with a curve rather than a step but in my mind it wont work because of the flow,....
it needs to come off one plane, at the optimal angle,..... and re connect to a plane at a similar or sympathetic angle.
But I could be wrong...? :shock: .....
I reckon the photos would be of a great help to demonstrate what you mean.
Im certainly going to make one of these boards because Ive got the board shaped already but I need some good dry Queensland weather to glass it.
SF. |
|
| Back to top |
|
|
Poobah
Dolphin Glider
Joined: 09 Jan 2004
Posts: 696
Location: California, San Diego
|
| Posted: Mon Dec 08, 2008 1:41 am Post subject: |
|
|
I took a look at some web pages that mention the stepped bottom on flying boats, and there was one that had a skeg aft of the step. That's something to ponder.
There was also mention of how critical it was to locate the step of the flying boat at the correct balance point. So I got to imagining the paipo rider getting into trim, pulling his body forward onto the nose....now where does that step need to be? That's when I strarted to think about an adjustable model. The tail section moves over the top of the nose section, and that way you can vary the distance between the step and the tail end (pod) of the board.
Top View
 |
|
| Back to top |
|
|
surffoils
Joined: 12 May 2007
Posts:
Location: Gold Coast, (finally), Australia
|
| Posted: Mon Dec 08, 2008 2:23 am Post subject: |
|
|
Thanks Poobah, Im certainly keen to continue with the design so any info , help or harrassment is fuel for the intellectual fire.
I will post construction pics after the crew have had a chew on this topic.
SF. |
|
| Back to top |
|
|
Thierry

Joined: 05 Aug 2005
Posts:
Location: France
|
| Posted: Mon Dec 08, 2008 6:27 am Post subject: |
|
|
Surfoils, for me, making a step on the bottom is not good to have an even water flow except if the board is travelling very fast so that the board becomes virtually shorter and with a reduced wetted area because the step : the board then ends at the step. If the board is not fast enough, and I think it's the case with a paipo, the step might create turbulences before the water follows again on the bottom of the board and thus slows it down.
Steps have also been shaped on the tail of windsurf boards but there is lots of power in the sail, as flying boats with big motors to really make then plane/fly on water.
I think boards turn when banked on the rail using partly the rocker curve so I'd say that a negative rocker in the tail might prevent the board to turn too well. But maybe with very drawn out rails on the tail and higher rails in the middle it could work.
Yeah Poobah, I've shaped a handboard out of a concave board (reversed skate deck) and I was suprised haw good it worked. The concave and the drawn out rails make the nose and tail to be higher and thus not very likely to pearl. But maybe that's too short a board to extrapolate.
That's only my take. It's difficult to talk intuitively about hydrodynamics.
_________________
Frogsurfer |
|
| Back to top |
|
|
bgreen

Joined: 20 Feb 2004
Posts:
Location: Qld. Oz
|
| Posted: Mon Dec 08, 2008 2:51 pm Post subject: |
|
|
Hello Brett,
The lack of waves in Qld can do strange things.
I ride two boards that have a small step, but it is in the opposite direction to your idea - step is toward nose which gets significantly thinner, relatively abruptly.
A couple of comments:
1. It looks like it could break easily - especially given two pieces will be joined.
2. construction from a material that would let you reshape the tail lift if the curve were too extreme might be worth considering. Alternatively, what about a wood prototype where you start with one piece of wood and over time start removing pieces as you approach the final design?
3. channels near the tail for water flow?
4. does the step need to be so abrupt?
regards
Bob |
|
| Back to top |
|
|
surffoils
Joined: 12 May 2007
Posts:
Location: Gold Coast, (finally), Australia
|
| Posted: Mon Dec 08, 2008 3:49 pm Post subject: |
|
|
Poobah, I agree finding the right position for the step will be important but I think I'll go with a guess and see how it performs. Making the board in 2 pieces should allow for new pieces to be made and tested. Thanks for the diagram.
Thierry, the step might screw the whole board because of the turbulence, but I think it might have something to do with the size of the step and the angle of the planing surface just prior to the step.
Bob, wood would be good to use but Ive got some free building foam sheets to play with.
Channels are the first mod once Ive got the base model up and running.
When you say abruptness did you mean the size or the angle of the step?
Joining the 2 parts will be tricky, any suggestions? |
|
| Back to top |
|
|
bgreen
Joined: 20 Feb 2004
Posts:
Location: Qld. Oz
|
| Posted: Tue Dec 09, 2008 7:41 am Post subject: |
|
|
Brett,
I was thinking of the size of the step. Construction wise, why not try what John Galera has done, gluing two sheet foams pieces and bending them over a jig. Just double the thickness of sheets from the nose to the step (as in the light blue image). He has posted the details on this site.
Swaylocks had a nice looking paipo in the last day or so, but it looked like a lot of foam was cut away to make a thin curved board. Glued sheets would be far less wasteful.
Surfed some very tiny waves on the compsand at the spit on Sunday. Nice bank, teeny waves.
Bob |
|
| Back to top |
|
|
surffoils
Joined: 12 May 2007
Posts:
Location: Gold Coast, (finally), Australia
|
| Posted: Wed Dec 10, 2008 11:55 pm Post subject: |
|
|
Bob, good idea, the eps sheets I have are 30 mm so Im going to glue 2 together.
Ive altered the shape of the concave so that the step will be only 5~6mm.
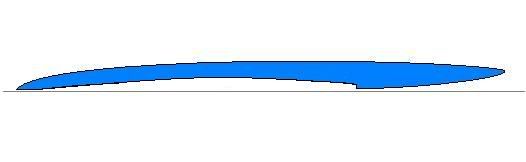
With the front and back sections planing, the 'theory' is that the water will flow off the step following line a.
The first part of the concave,b, rises away from the water flow hopefully reducing wetted surface, and finally the rear part of the concave, c, drops down to provide a planing surface for the rear of the board
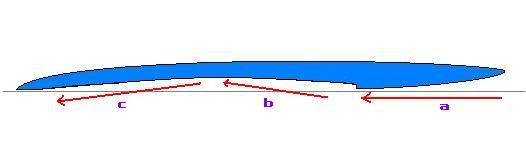
In reality, I think the rear of the board will sit lower in the water but I plan to use a fairly thick and wide (bouyant) rear end to keep the tail up and planing.
 |
|
| Back to top |
|
|
mrmike

Joined: 06 Sep 2007
Posts:
Location: coronado, ca
|
| Posted: Sat Dec 13, 2008 4:12 pm Post subject: |
|
|
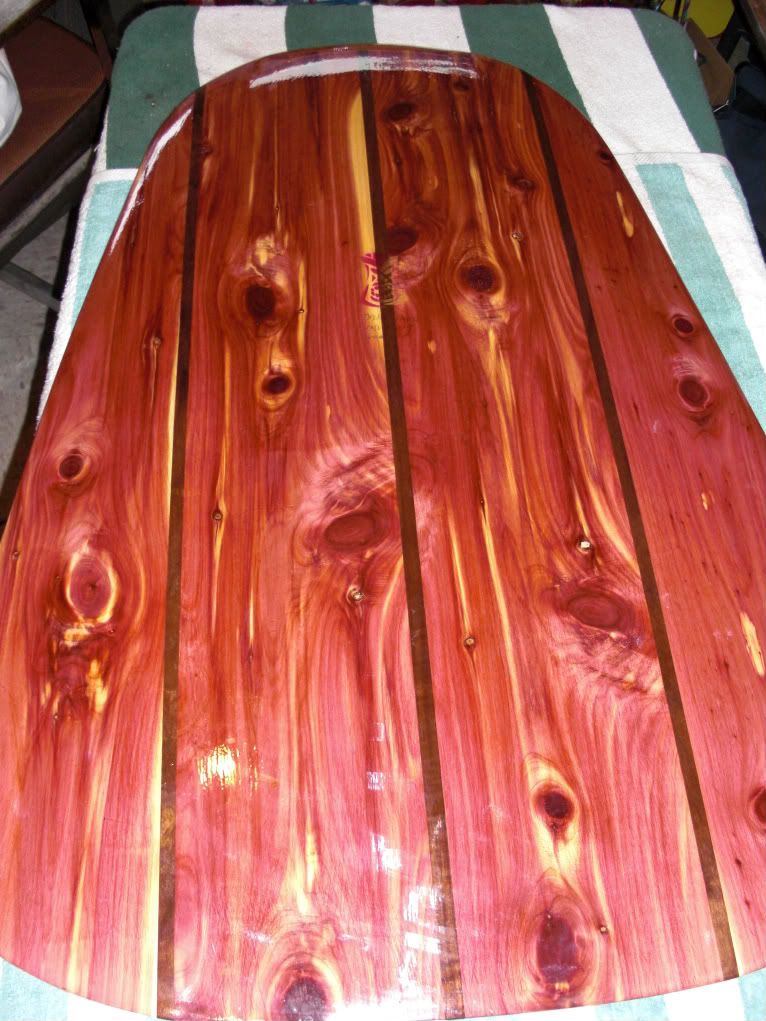
HERE IS ANOTHER RED ONE (36X26) BECAUSE I SOLD THE OTHER ONE . I AM MAKEING A SUITCASE BOARD NOW THIS WAS POOBAH IDEA I WILL SEND PIC'S WHEN IT IS FINISHED MRMIKE 
_________________
PAIPO ON
blog http://mrmikespaipos.blogspot.com |
|
| Back to top |
|
|
bgreen
Joined: 20 Feb 2004
Posts:
Location: Qld. Oz
|
| Posted: Sat Dec 13, 2008 4:39 pm Post subject: |
|
|
Hello Mike,
I will be interested to hear more about the suitcase board as I am working on another trip for 2009. Currently I am looking into getting a two part paipo.
I was doing some work on a board yesterday and would be interested to know a bit more about how you approach shaping.
Do you get one half right then try to match the other half, or do you count plane cuts and match that way? I have been working from rail to centreline, getting the right rail line/thickness first. Any dvice is welcomed.
thanks again
Bob |
|
| Back to top |
|
|
mrmike
Joined: 06 Sep 2007
Posts:
Location: coronado, ca
|
| Posted: Sat Dec 13, 2008 5:32 pm Post subject: |
|
|
what I do is mark a center line on the edge all the way around then work from the center of the board to the rail. use a stright edge or framing square to keep both sides the same. my boards the bottoms are mostly flat so I have no problem with that and the top dose not matter that much MRMIKE
_________________
PAIPO ON
blog http://mrmikespaipos.blogspot.com |
|
| Back to top |
|
|
bgreen
Joined: 20 Feb 2004
Posts:
Location: Qld. Oz
|
| Posted: Sat Dec 13, 2008 5:41 pm Post subject: |
|
|
Mike,
Thanks. I didn't understand what you meant here: "what I do is mark a center line on the edge all the way around then work from the center of the board to the rail. "
Do you mean that you mark a line on the rail?
Bob |
|
| Back to top |
|
|
mrmike
Joined: 06 Sep 2007
Posts:
Location: coronado, ca
|
|
| Back to top |
|
|
bgreen
Joined: 20 Feb 2004
Posts:
Location: Qld. Oz
|
|
| Back to top |
|
|
|
|
You cannot post new topics in this forum
You cannot reply to topics in this forum
You cannot edit your posts in this forum
You cannot delete your posts in this forum
You cannot vote in polls in this forum
|
|
